Saturday, February 13, 2021

Oh, DANG! Chewy Chocolate Chunk Cookies


This is not the 'real' name of the cookies, in case you couldn't tell, but they should be called that. Here's what my copy of the recipe looks like-I think if a printed recipe has stains like this, it's obviously a favorite!


 I found this recipe years ago when we were living in Las Vegas, and they embody all that I want in a chocolate chip cookie-I love when they are chewy!  I have a friend that asked me to make them every time we had a social function (I'm looking at you, Jeni💜).  I will be honest, though, with the chilling time required to make them the chewy deliciousness they are, that could have also been a deal-breaker for me. 


On this particularly nasty, icy day, I thought it would be a good idea to do a cooking project with the kids.


Now, I am going to be honest folks: I don't have a lot of pictures of this particular recipe in-action, as I lost my temper at Sir.  I'm not proud of it, but it is real life.  With the time that we (everyone) has spent at home this past year, Sir has done some reverting back to "toddler-dom": he calls for me incessantly, especially when I am out of his sight.  I am his main playmate when he has breaks during school time.  I am his constant.  It's great and grating at the same time-isn't that motherhood?!  Anyway, he has taken to asking questions constantly, and peppers me and his dad with questions ALL. DAY. LONG.  This afternoon I was not nice, and when I burned my hand on the melted butter while making the cookies, I didn't want to answer HOW I could have burned myself; I just wanted someone to ask me if I was okay.  Blah.  I was a jerk, and I apologized.  And, reminded people that I am human, too, and not always on my best behavior.


On to the recipe!  

Here is the link to the recipe I pinned on Pinterest a million years ago from 

Sally's Baking Addiction :https://sallysbakingaddiction.com/chewy-chocolate-chip-cookies/#tasty-recipes-70437

Thank you for such an amazing recipe, Sally's Baking Addiction-I didn't copy the recipe word-for-word


Chewy Chocolate Chunk Cookies

Yields 16 cookies


Ingredients:


-2 1/4 cups all purpose flour

-1 tsp. baking soda

-1 1/2 tsp. corn starch

-1/2 tsp. salt

- 3/4 cup (1.5 sticks) unsalted butter (I used salted butter, and adjusted the salt measurement accordingly), melted

-3/4 cup light brown sugar, loosely packed

-1/2 cup granulated sugar

-1 large egg + 1 egg yolk

-2 tsp. vanilla extract

-1 cup chocolate chips -or- chocolate chunks


Directions:

In a large bowl, mix the flour, baking soda, corn starch, and salt, and set aside.

In a medium-sized bowl, whisk the melted butter, brown sugar, and granulated sugar together until there are no brown sugar lumps.  Whisk in the egg, then egg yolk.  Finally, whisk in the vanilla.  


Lala needed to poke the egg for whatever reason


Pour the wet ingredients into the dry ingredients, and mix together with a large wooden spoon or rubber spatula.  The dough will be very soft, yet thick.  Fold in the chocolate chips/chocolate chunks-they may not stick to the dough because of the melted butter, but do your best to get them evenly distributed throughout the dough.  

Cover the dough and chill for 2 hours, or up to 3 days.  Chilling is a mandatory step so the cookies turn out chewy!

Take the dough out of the fridge, and allow to slightly soften at room temperature for 10 minutes.

Preheat the oven to 325°F.  Line two large baking sheets with parchment paper or silicone baking mats and set aside.

Roll the dough into balls, about 3 Tablespoons each.  The dough will be crumbly, but the heat of your hands will help the dough come together.  Roll the cookie dough balls to be taller rather than wide, to ensure the cookies will bake up to be thick.
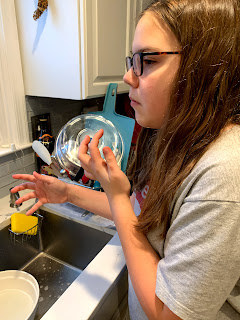


Lala was annoyed that I asked her not to eat the 
raw dough, so she licked her fingers instead (when we were done, of course)


 Place balls of dough on each cookie sheet with 1-2 inches between each ball.  The original recipe calls for 8 balls of dough per pan, but with smaller people helping out, we did 9 balls.

Bake the cookies for 11-12 minutes.  The cookies will loo very soft and under-baked, but will continue to bake on the cookies sheet while cooling.  Allow cookies to cool on the cookie sheet for 10 minutes before transferring to a wire rack to cool completely.  

The cookies stay soft and fresh for 7 whole days at room temperature.  Cookies may be frozen up to 3 months.  Rolled cookie dough may be frozen for up to three months and baked in their frozen state for 12 minutes.  


Tuesday, February 2, 2021

Crispy Brussels Sprouts

 This is a recipe from Lala's cookbook that she had to do for her FACs class, which was similar to Home Economics.  We had a good time creating recipes, and testing the recipes her teacher had given them to make and include in their books.  Most of the recipes that she was to make were pretty basic, which were great for the "budding chef", and this one is easy, too, but La had to write the recipe down as I had never used a recipe for it.  I can almost guarantee she is the only student that made Brussels sprouts!


**I highly recommend writing down those "family" recipes, or recipes that you make from memory-you never know if you (or a loved-one) will need it!**


I don't have a problem eating Brussels sprouts, but can understand why a lot of people do not prefer them-they can be...sulfuric if not prepared properly.  I think that may be the reason why a lot of adults don't care for vegetables, which blows my mind!  I love almost every vegetable-it makes such a difference when they are prepared properly!


So, I implore you: if you have traditionally not liked Brussels sprouts, give them another try using this recipe!  I think I might just change your mind :). 

These are a delicious accompaniment to chicken, beef, fish, and pretty much everything else you'd want to serve.


The pictures I took of this recipe were ones that were taken for the assignment-you get a glimpse of my favorite girl, and budding chef, Lala!


Crispy Brussels Sprouts


This picture was taken before the fried onions were added


Ingredients:


16 ounces fresh Brussels sprouts, quartered

1 clove garlic, minced

1 Tbsp olive oil

3/4 tsp Kosher salt

3/4 tsp coarse-ground black pepper

1/4 tsp garlic powder

1 Tbsp balsamic glaze

1/2 cup fried onions (we used French's Crispy Fried Onions)


Directions:

1. Heat olive oil in medium sauté pan over medium heat.  


2. Add minced garlic to hot oil and cook until fragrant, approximately 1-2 minutes.


3. Add Brussels sprouts to pan, and stir to coat.


4. Sauté sprouts over medium-medium high heat, stirring occasionally, for 15 minutes, or until evenly browned.


5.  Season with salt, pepper, garlic powder and stir.

6. Add balsamic glaze, stir to coat, and remove from heat.


7. Add fried onions to top, and serve!  


Note:  My budding chef decided to stir the fried onions in the pan, where in the directions it says to top the sprouts-it won't taste any different, but stirring the fried onions in will make them lose some of their crispiness 😉


I can't tell you how much fun it was to cook with Lala-she has a genuine interest in all things culinary, and is usually the one that is in the kitchen, asking to help with dinner these days!  While I don't always let her help, she watches too, and retained enough of what I have told her about kitchen safety and cleanliness that she has gotten As on those assignments in her FACs class!  Woo-hoo!  

Lala and her brother Sir are so interested in learning how to cook that I enrolled them in a 4-week "Junior Chef" class at a local center for the arts-it will be a very small class (only 4 students), but they will be learning basic cooking skills and recipes, and will be able to be around kids their own ages for 2 hours a week!  I'm excited for them, and will let you know how it goes.


Happy Eating, Everyone!


Thursday, January 28, 2021

Creamy Roasted Tomato Soup

 Woo, man!  I am not going to bore everyone with telling you where I have been, or why I haven't blogged in such a long time.  Suffice it to say that life has happened, and more life happened, and well, here I am.  


Today's recipe is one that I came up with on my own after seeing the amount of tomatoes we had ripening on the counter that were starting to look...funky.  Not rotten, mind you, but they were definitely heading in that direction.  Being one that doesn't like to waste food, I figured it would be a good excuse to make some lunch for the family (which I haven't been doing at all, since the kids are home with distance learning-they like to fix their own lunches.)

So, here you are, "Creamy Roasted Tomato Soup" or as I referred to it to my family, "This Stuff is Going to Go Bad Soup" 😄

Please note:  I am not a food stylist, so the pictures I have are not going to be as pretty as those professional gigs on Insta.  But, I can promise the food will be good!


Creamy Roasted Tomato Soup


Ingredients:

6 overripe large tomatoes (not rotten, but starting to look tired)-roughly chopped

1 medium yellow onion, roughly chopped

3 garlic cloves, skin taken off and smashed with the side of a knife

1/2 tsp Kosher salt

1/2 tsp coarse-ground pepper

1/4 tsp granulated onion powder (or to taste)

2 tsp olive oil

32 ounces (1 large carton) vegetable stock

1/4 cup heavy cream

Grated parmesan cheese for garnish


Directions:

Preheat oven to 425°f

Roughly chop your tomatoes and onions, and place them in a large bowl with the smashed garlic.  Add salt, pepper, onion powder, and olive oil, and stir to coat.  

Transfer vegetables on to large baking sheet, and arrange so they are in a single layer.  


Roast vegetables at 425° for 25-minutes, or when they are starting to brown/caramelize.  

Remove from oven and transfer veggies from baking sheet to large stockpot.  

Add vegetable stock to pot, and bring to boil over high heat. 


Reduce heat to medium, cover, and cook for 15 minutes. 
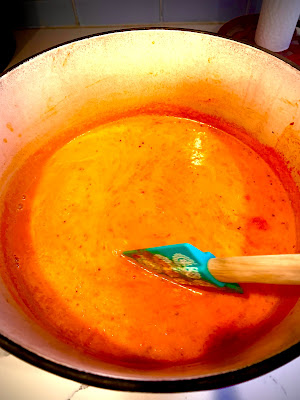
After cooking, turn off heat under pot, and transfer vegetable and stock to a blender.

Puree to desired consistency (I left ours a little chunky)  Note: you may need to blend soup in stages so the blender is not overfilled, causing potential for the hot liquid to go everywhere or burn you.

Transfer soup back to stock pot, and turn heat to low.  


Stir in heavy cream and adjust seasonings to taste.  

Serve with a sprinkle of grated parmesan cheese and enjoy!


Since I was making this for my family's lunch, I served it in mugs so they could sip it easily.  I made it a meal by including a cheddar cheese "toasty" (Ciabatta bread with sharp cheddar cheese, toasted), and apple slices.
  It turned out to be a tasty, simple meal, and it warmed us up on this cold and windy day.  


Wednesday, September 6, 2017

Slow-Cooker Pork and Hominy Stew

I'm happy to give you week 2 of recipe testing!

Did anyone try the Steak and Spinach Salad?  What'd you think?  Feel free to leave a comment on that post if you did, and let me know how you liked it or if you changed anything!

This weeks' recipe was chosen because I had anticipated that both children had soccer practice, and I always think that it's better to have a home-cooked meal vs. take-out on those days.  And I don't know about you, but I always feel so put-together when I have dinner in the crock pot, like I have really killed this "adulting" thing 👯

This recipe was originally featured in the October 2015 issue of Food Network Magazine, in their "Weeknight Cooking" section.  It stood out to me, because I really love an easy crock pot meal with little to no prep time! 

Here's the original recipe from the magazine:


Slow-Cooker Pork and Hominy Stew
ACTIVE: 20 min  |  TOTAL: 7hr 20 min  |  SERVES: 4

Ingredients:

1 1/2 pounds boneless pork shoulder, cut into 1-inch pieces

2 15-ounce cans hominy, drained and rinsed

2 cups low-sodium chicken broth

1 16oz. jar salsa verde

2 poblano chile peppers, seeded and chopped

1/2 bunch fresh cilantro, roughly chopped, plus more for topping

Kosher salt

10 6-inch corn tortillas

1/4 cup sour cream

1 romaine lettuce heart, shredded

1 avocado, diced

Directions: (Original directions from Food Network Magazine are in bold; my substitutions/alterations are marked with an asterisk (*).


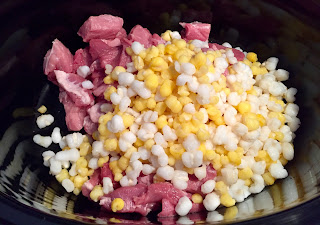
1.  Toss the pork and hominy with the chicken broth, salsa verde, poblanos, cilantro, and 1/2 teaspoon salt in a 6-quart slow cooker.*


*I trimmed the pork shoulder a bit while I was cutting it up, as it was pretty fatty, and I can't stand "wiggly" pieces


*The grocery store was out of chicken broth, so I used the chicken stock that I already had in my pantry


*Salsa verde was available in a 16-ounce jar, but with medium heat, which I knew the kids would never go for, so I got two 7-ounce cans of mild salsa.


2.  Tear two of the tortillas into small pieces; add to the slow cooker, and toss.  


3.  Cover and cook on low, 7 hours.


4.  Warm the remaining 8 tortillas as the label directs.  Top each serving of stew with sour cream, lettuce, avocado, and more cilantro.  Serve with the warm tortillas*


*I neglected to add the lettuce and put the tortillas on the side before I took this picture, but we did have them in the final product!

Our Opinion on the Recipe:

We really liked it!  It was an easy meal, and hearty for a chilly evening.  Soccer ended up being cancelled, but having dinner in the crock pot meant that I had more time for passing drills with my son, because he still wanted to get some soccer in.

What We Would Change:

I thought it was great recipe, and I wouldn't change anything!  I would probably skip the corn tortillas for serving, and if we needed a bread item, grill some Bolillo rolls with butter in a skillet to accompany.

My husband wasn't home for dinner, but he will be trying it, and giving me his opinion.

My daughter liked it, though she said it was a little too spicy.  Even though I was careful about taking out the veins and seeds in the poblano, it still had a hint of spice.  If serving again, I would substitute canned mild green chilies.

My son loved it, and agreed that it was a little too spicy.  He also wanted more sour cream and avocado, which I am sure would help cut the spice.

OVERALL SCORE:

4.8 out of 5

If you see in the picture, I served the stew with a Southwest vinegar slaw, one of my favorite accompaniments to Mexican-type food.  Here's my recipe (I typically make it according to taste, and haven't written it down before):

Southwest Vinegar Slaw Recipe:
ACTIVE: 15 min  |  TOTAL:  20 min  |  SERVES: 4

Ingredients:

1/4 head large red cabbage, shredded

2 green onions, minced

1/3 cup carrot, shredded

1/4 cup fresh cilantro, chopped

3 Tablespoons olive oil

2 teaspoons white vinegar or fresh lemon juice

1 teaspoon honey

1/2 teaspoon Kosher salt

1/4 freshly ground black pepper

1/2 teaspoon chili powder

1/2 teaspoon garlic powder

1/2 teaspoon onion powder

1/2 teaspoon ground cumin

Directions:

1.  In large bowl, combine olive oil, vinegar (or lemon juice, if you're using that), honey, Kosher salt, pepper, chili powder, garlic powder, onion powder, and cumin.  Whisk together until thoroughly combined.  Set aside for at least 5 minutes for flavors to meld.

2.  Add red cabbage, green onion, carrot, and cilantro to bowl, and toss with dressing until coated.

3.  Serve!


If you decide to make these recipes, please comment on how you liked it, or what you changed.


Thanks for visiting, and I will see you next week!


GUTEN APPETIT!


Wednesday, August 30, 2017

Steak-Spinach Salad with Sour Cream Potatoes Recipe

This is it!  

My very first Food Network Magazine recipe test, and I'm excited to do it.  

This recipe originally appeared in the July/August 2010 Food Network Magazine.  I chose it as my first recipe because it was a part of their, "Weeknight Cooking" recipe collection, which means the recipes are meant to be quick!

As promised, I will follow the recipe as written, noting the changes that I may have needed to make due to availability of ingredients, availability of kitchen equipment, etc.  

At the end, I will report on my family's opinion of the finished product, as well as my personal suggestions on changes I would make the next time I prepare the recipe, if any are needed!

So, let's get started:


Here's the original recipe from the magazine:


Steak-Spinach Salad with Sour Cream Potatoes
Active: 35 Minutes  |  Total: 1 Hour 20 Min.  | Serves: 4

Ingredients:

2 medium russet potatoes

3 tablespoons olive oil, plus more for brushing

1/2 cup sour cream

2 tablespoons buttermilk

1/4 cup chopped fresh chives

Juice of 1/2 lemon

Kosher salt and freshly ground pepper

1 3/4-pound boneless sirloin steak

1 large red onion, sliced into thick rings

6 ounces baby spinach or chopped regular spinach

2 to 3 tablespoons steak sauce


Directions: (Original directions from Food Network Magazine are in bold; my substitutions/alterations are marked with an asterisk (*).

1.  Preheat oven to 400°.  Pierce the potatoes with a fork and brush with olive oil


-Bake directly on the oven rack until tender, about 1 hour* 
*As you can see, I used my really beat-up "baked potato pan" instead of doing it directly on the rack 

-Cool slightly, then cut into chunks.  


-Mix the sour cream, buttermilk, chives, and lemon juice in a large bowl, and season with salt and pepper


-Stir in the potatoes


2.  Meanwhile, preheat a grill to high*  
*We do not currently have a grill, so I used a cast-iron skillet, heated over a medium stove.  This is an easy alternative to grilling, especially if it's cold outside!  Cast-iron is cheap, and if well-maintained, will last FOREVER.


-Brush the steak and onion rings, and season with salt and pepper


*There weren't any red onions at the grocery store, but I did have 1/2 of one in the refrigerator, so I used that, and 1/2 of a yellow onion.


-Grill the steak until marked on the bottom, about 7 minutes, then turn and cook 4 to 5 minutes more for medium rare*


*I seared both sides of the sirloin for approximately 5-6 minutes, then transferred the skillet into the 400° oven to finish cooking, for 12 minutes (for medium rare)

-Grill the onion rings until charred, about 2 minutes per side.*


*Since I was doing this in the skillet, I needed to wait until the steak was done to make the onions.  Looking back, I could have had both of my cast-iron skillets cooking at the same time, but we have a small oven!

-Transfer the steak and onion rings to a cutting board and let rest 5 minutes


-Roughly chop the onion rings and toss with the spinach, steak sauce, 3 tablespoons olive oil, and salt and pepper to taste in a bowl


-Thinly slice the steak*


*I cooked the steak to medium rare, as the recipe suggested, but it was a little too underdone for me to serve to my children, so I cooked it longer (1 minute per side) in the skillet to be medium for the kids.  I ended up putting the rest of the steak back in the skillet, and back in the oven for another 15 minutes, after I got the kids plates fixed.

-Divide the salad among the plates, top with the steak, and serve with the potatoes


Our Opinion on the Recipe:

We loved it!  It was an easy recipe, and will be something I make again.  While it was a little more work intensive than I would have desired, I believe that using the grill, rather than the cast-iron skillet, will cut time off the recipe.  

What We Would Change:

My husband said that it was delicious, and he wouldn't change anything!  

I would add fresh dill to the potatoes the next time, as I believe it would add a great taste.  And because I love vegetables, I would add some grilled bell pepper to the grilled onions, and possibly cherry tomatoes, to make the salad more colorful and nutritious.

My son said it was awesome!

My daughter wondered why I served spinach, even though I know that she doesn't care for it 😑  Note: I will continue to serve spinach to her.


OVERALL SCORE:

4.8 OUT OF 5


If you decide to make this recipe, please comment on how you liked it, or what you changed.

Thanks for visiting, and I will see you next week!


GUTEN APPETIT!